Showing posts with label Conversions. Show all posts

Saturday 26 September 2020

Not Quite Victorious Army

 But I'm sure they will be when they eventually get onto the table for a game!

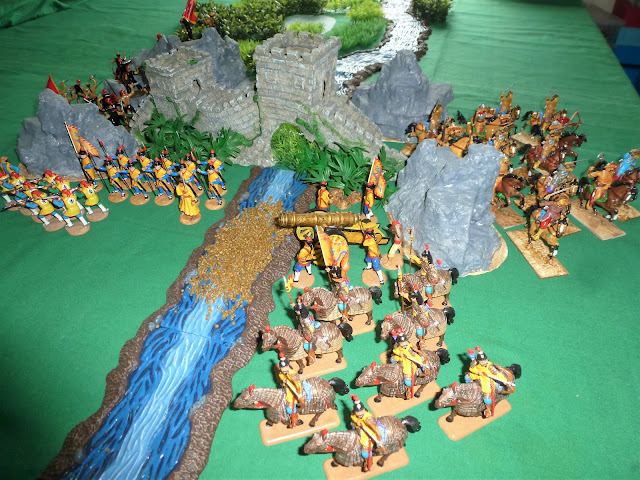
For some time now I've been building up a generic Chinese army, I'm not sure why and I can't remember how it started, perhaps I just like the colours.  And the flags, the flags are great.  Anyway, there is no grand plan, I just bang out another unit every now and then when an idea comes to me, it's quite therapeutic, doing something different.  Here's what I've got so far:


When I call them generic what I have in mind is that they will be used as an opposition in a Colonial scenario or possibly in the "Back of Beyond" or even at a stretch against Samurai.


These irregulars in black pyjamas and red bandanas are based on the Vietnamese Pavilion Noirs, mostly made from Hing Fat and other pirate figures, some have been given shields from wooden disks, others have Chinese heads (from Dorset Model Soldiers) just to give a bit of variety.


The flag has been cut out using pinking shears to give it a scalloped edge.  The inscription means something but I can't remember what, hopefully nothing rude.


Imperial Infantry, Artillery and Cavalry in the centre, irregular horse on the flank.


The matchlock men are more Hing Fat pirates, their tunics extended with plasticene, otherwise just a paint job.  The spearmen are medieval knights, made in China, which are currently available everywhere, and very useful they are too.  For a more Quing period look they've been given plumes on their helmets and replacement spears from metal rod with tassels added.


The cannon started life as a table cigarette lighter, it looked sufficiently gaudy for the job and just need a spruce of paint.  The crew have been given Mandarin hat heads (Dorset Models again).


The Imperial Cavalry started life and Italieri Mongols, the flags I found on the internet and just played around with them in Publisher.


The irregular Cavalry are the remains of the Italieri Mongols padded out with some Huns made in Spain by Jecsan.


More of the irregular Cavalry.

Tuesday 24 March 2020

7YW Prussian assault pioneers

Some time back, a 7 Years War siege game we were planning called for an assault on a breach in the walls of a fortified city, so I bodged up these figures for it.

All these conversions started life as 54mm plastic toy soldiers of the American Revolution made by Louis MARX.  The figure on the left was advancing with musket at the ready, on the right he was stabbing down, their muskets have been trimmed away and hats carved off, to be replaced with spare mitre caps from the HaT 7YW Prussian infantry set, then its just a case of assembling and pinning the ladder (a spare form the TIMPO Fort Apache set) to them, their hands have also been built up a bit with milliput.

The sappers with axes are the same two MARX poses used for the ladder carriers, again they've had their muskets trimmed away and headgear replaced with HaT spares, the axes are from the TIMPO Vikings and the leather aprons are cut from cartridge paper stiffened with PVA.  The chap throwing grenade is the British officer from the same American Revolution series, his cane has been cut away and a grenade made from milliput, the fuses are made from old fashioned fuse wire (can you still get that?).

We all have to get our ideas from somewhere and the inspiration for these conversions came from a book illustrating old German Tin Flats, these conversions were previously shown in an article I did for Plastic Warrior magazine but I didn't get to show where the idea came from.

The book is Soldaten des Rokoko by Waldemar Piecha, published in 1982 (ISBN 3-423--02874-2), it contains 72 prints like these, each depicting different Regiments and formations of the Prussian army.  It's a great resource for uniform info and every figure illustrated is unique so it's a goldmine for ideas.  

Tin Flats were relatively cheap and easy to manufacture, the designs were drawn and then engraved into slate, so the mould making process is relatively quick and inexpensive.  Designs were often copied from antiquity as well as period art sources which gives them a sense of the times they depict.  The collecting potential for Flats is enormous, covering every historical period, they are very well documented and books on Flats are by far the largest section of my toy soldier library,  yet they are a section of the hobby that has been virtually bypassed by the world outside of Germany.

Monday 10 February 2020

Milliput or Green Stuff?

For several decades now I have been happily converting toy soldiers using the two part modelling compound known to all as Milliput, which does have it's limitations and sometimes causes a bit of skin irritation.  In the meantime, the rest of the world seems to have passed me by and moved on to using a similar product known as Green Stuff.  Not wanting to miss out, I wandered down to Games Workshop to see what all the fuss was about and bought some.

I spent much of last year basing and painting up just about every Viking, Saxon and Norman figure that I could find, so in order to get a bit of variety I started combing through the junk boxes at toy soldier shows looking for damaged figures to repair and anything that might be easily converted without too much effort.  My first attempt with Green Stuff was just adding beards and extra hair, nothing too ambitious!

In The Works (a UK book, toy and craft shop) I found some rather useful little wooden disks, they come in three sizes, the middle one is perfect for circular shields on 54mm toy soldiers, while the small one is good for bucklers etc and the largest I will use as an alternative to metal washers for bases.  The same store also provided "Pearl Stickers" I'm not sure what you are supposed to do with these but they are little half domes of plastic, sticky on the flat side, and perfect for making shield bosses.

The look I was going for was a sort of generic Hiberno, Celtic, Pictish barbarian look.  The first two above started life as Indians in the Jean Hoefler (German) Wild West series, with feathers and trouser fringes trimmed off, then facial hair, shields and suitable weaponry added, the monk was a Hoefler nativity figure of Joseph who has had a crucifix on a pole added.  Finally, a Cherilea (UK) Saxon, who had lost his spear has been rearmed then given a shield and painted up as a "Wild Irish" noble.  

Another wild west Indian, this time by Cherilea, brandishes a new sword while hurling insults at the enemy.  A Cherilea Saxon archer who had lost his bow is now throwing a dart, a peculiarly Irish weapon of the time, the scar from the quiver trimmed off his back has been hidden under a shield which is hung on a strap cut from metal foil.  Next a REAMSA (Spanish) Viking is unaltered, just painted up to join the Irish warband.  The last figure is from a recent wild west set made in China, I think sold under the brand name Supreme, the rest of the range are really rather poor but I quite liked the pose of this one thrusting with a spear.

Three more recruits for the Irish warband, a Hong Kong copy of a Marx (USA) Viking has been given a long handled axe, another REAMSA Viking just given a paint job and a Beja Tribesman made by Armies in Plastic (USA) who is suitably barefoot and ragged to look the part.

Getting back to the Green Stuff, I found it easy to mix and easy to apply but it hardens much faster than Milliput so you have to work fairly quickly, I wasn't expecting that and I don't see how some modellers on other blogs can do such extensive and intricate work using it. I guess it's a bit of a learning curve but on balance I think I still prefer the Milliput.

This lot would never win any prizes in a modelling competition (not that I go in for that sort of thing) but I think I'll get away with it when they're all mixed into a horde on the wargame table.  At the end of the day it's all just a bit of fun...……..isn't it?

Tuesday 19 November 2019

Stuart Asquith's Big Wars - Battle of Tanga 1914

Across the blogosphere collectors and wargamers are running games in memoriam to Stuart Asquith who sadly passed away recently, I hadn't cleared up after our recent game set in North Africa so decided to play a solo game using the Big Wars rules written by Stuart and Jack Alexander.  Big Wars covers the period 1880 to 1914 so I thought the Battle of Tanga fought during the WW1 campaign in German East Africa would squeeze under the wire.  I had to take a few liberties historically but here's how it went:

In November 1914 Britain sent an Indian Expeditionary Force of about 8,000 men to invade German East Africa, the plan was to make an amphibious landing at the port of Tanga then advance north to meet up with troops marching south from British East Africa, trapping the German "Schutztruppe" in a giant pincer movement.  A simple plan, what could go wrong?  Er….. plenty apparently.

There was an unofficial Coastal Truce agreement under which the Royal Navy were required to give the Germans 24 hours notice of any intended attack (I kid you not!).  On 2nd November 1914 the Navy demanded unconditional surrender of the town and port, this was ignored and next day the IEF began landing, no resistance was expected from the token garrison.  However, on receipt of the demand the German commander had called for reinforcements and started digging in (well you would wouldn't you)

Tanga was the coastal terminus of the Northern Railway and the Germans began rushing troops by train, around the clock, to the port.  The initial IEF landing on 3rd November was supported by salvos from the supporting naval escort, it had little effect.  Above, the German Askaris were armed with the obsolete model 1871 rifle which fired black powder rounds, clouding them in smoke with every volley.  

Here the IEF debark from their landing barges.  I played the game on an area of about 5' x 5' which I found from previous experience is fine for Big Wars, movement distances are quite short and casualties from firing fairly light until you get to quite close range, so you really need to get troops into melee to get a decisive result.

A couple of liberties taken here for the benefit of a good game.  German naval units fought on land throughout the campaign, but not at Tanga, also the Germans had two field artillery pieces but they arrived too late to take any part in the battle.  On the British side most of the units were from Indian Regiments but I have included units of the Kings African Rifles who also fought throughout the campaign but not at Tanga.

The Askaris fall back steadily while keeping up a steady fire at close range which begins to blunt the advance.  The rules allow artillery and machine guns to move or fire, but movement rates for MGs not mounted on carriages are short so the British support units fell far behind the infantry advance.

The IEF occupy part of the town and the Ghurkas hoist the Union Jack but their success is short lived as German reinforcements continue to arrive and a counter attack throws the British back.

A fun game, quick and easy to master, and a good scenario for solo play as there isn't much scope for tactical movement.  I playtested the rules quite a bit when they first came out in 1993 and used them in a "play by email" game that I hosted a few years ago (see Big Wars link in right hand column) but apart from that they've been rather overlooked, perhaps it's time they got a bit more of a regular outing.

In 1914 the IEF outnumbered the Schutztruppe by 8 to 1 so, not unnaturally, the British Staff believed the battle would be a walkover.  The Navy were ordered not to support the attack so that the town might be taken intact for use by the occupying force, for the same reason the IEF mountain batteries were not landed.  The result was that the entire IEF was evacuated on 5th November leaving most of their equipment behind, perhaps not the most ignominious feat of British arms, but well up there.

Saturday 9 November 2019

Battle of al-Musayfirah 1925

We felt it was time to give the "One Hour Wargame" (OHW) rules by Neil Thomas another airing, Anthony and I both like the fast moving simplicity of this game system and it works well with 54mm toy soldiers.

Looking back through old copies of Wargames Illustrated for inspiration I found a scenario for the Battle of al-Musayfirah in 1925 during the Great Syrian Revolt.   After WW1 The League of Nations had given France a mandate to govern Syria and the French promptly instituted a number of measures to control the local tribes.  This inevitably lead to a nationalist uprising  by the Druze, which spread to the other tribes.


We chose scenario 15 from OHW, Fortified Defence, as it best reflected the actual battle.  Basically, a French Foreign Legion column was ambushed and badly mauled so the survivors took refuge in an old Turkish fort at Suwayda.  A relief column was prepared and an advance party sent forward to set up a defensive position at the town of al-Musayfirah as a staging post for the main column following behind.   A traditional colonial campaign in the finest traditions of P C Wren and Beau Geste, here's how it went:

On the left is the old Turkish fort at Suwayda, the town behind it in the rear centre is  al-Musayfirah, to the right of the town is a rocky area, in the OHW scenario this should be woods but rocks are more suitable for the desert so we just gave them the same terrain effect for movement and combat as woods.

We diced to see what forces each side would get, the French got 3 Inf, 2 Arty and 1 Cav, while the Druze got 3 Inf, 1 Heavy and 2 Cav.  That seemed to represent the original forces quite well, I wasn't sure what to use for the Druze heavy unit, in reality they had some artillery but I couldn't find any references to machine guns or other heavy weapons so a little imagination was called for.

The French start with one unit in the old Turkish fort at Suwayda and one in al-Musayfirah.  The Druze opened the ball with a mass attack on the garrison in the old Turkish fort.  Victory would go to whichever side occupied both the town and fort at the end of 15 turns.

The rules give the two garrisons additional firepower, which reflects the actual battle as the French had machine guns which took a terrible tole on the attackers.   To even things up the Druze have a refit rule which allows them to create a second wave with all their original units at their starting positions, rather like the Zulu wave mechanism we used in our recent Rorke’s Drift game.

The French cavalry came from the collection of veteran wargamer John Ruddle who created them from bits and pieces of old Britains hollow cast Spahis, all repaired and repainted.  Behind them the French Command are represented by Starlux mounted FFL.

The first wave of the Druze attack succeeds in overrunning the defenders in the fort and pushing back the relief column.  At this point they invoked the refit rule, leaving the fort abandoned temporarily while the second wave formed up for a renewed attack.

In the Druze second wave one unit has reoccupied the fort while the main push is directed against the garrison at al-Musayfirah.  Here the remaining infantry and Command, with heavy unit attached, use the cover of the rocky terrain to advance for a mass attack on the town.  The camel borne gun is the handiwork of Ross Macfarlane, as are the fort and town buildings.

The all out assault goes in, Druze mounted units rush the town while the foot provide covering fire from the rocks, will the beleaguered garrison hold out?

As we reached turn 15 and the end of the game, the superior firepower of the French forces carried the day.  A bombardment of the fort drove the Druze defenders out, leaving it unoccupied, while the mounted units caught in the open were wiped out by the French mountain artillery.

Anthony insisted we take a picture of the lunch, l'd like to tell you it was something suitably North African but clearly it's traditional beer and pizza.

The game played out very similar to the real battle, in 1925 the Druze suffered heavy casualties from the French machine gun strongpoints in al-Musayfirah.  They did manage to break into the town and promptly made off with all the columns horses and donkeys, but the attack through the rocks was broken up by a continuous bombardment from French aircraft.

Friday 21 June 2019

Battle Cry and the Risorgimento

The date for our next game had been in the diary for a couple of months and we talked about trying something different, but as the day drew nearer one of my cats broke a leg, which rather changed the dynamic in our calm and peaceful household.  Rather than postpone we opted for something easy to set up and play, but still wanted something a bit different.  A quick search through the scenarios on the Command and Colours website gave us Garibaldi's invasion of  Sicily in 1860 and the Battle of Calatafimi.

Garibaldi has landed and declared himself dictator of Sicily, as he marches on the capital, Palermo, the Neapolitan General Staff send General Landi to block him and put down the popular insurrection.  As usual we were playing a wargame with 54mm toy soldiers, here's how it went:

The opening positions find Garibaldi and Bixio with their 1,000 Red Shirts (the "Mille") occupying the village of Vita on the left, Major Sforza has rushed the Neapolitan infantry forward to occupy the hills of Pianto dei Romani in the centre.  On the hills beyond we can just make out the Picciotti, local militia, who have turned out to support the uprising.  On the right we find General Landi in Calatafimi bringing up the rest of the Neapolitan troops.

The Neapolitan troops have been pushed forward to occupy the hills, the artillery is served by seasoned professionals, the infantry are well trained and armed but are raw recruits, if they lose a morale check they will fall back two hexes.

General Landi in Calatafimi rouses the Chasseurs and reserve infantry, but they won't move out until after the fourth turn.

Garibaldi's Mille advance on the hills from the village of Vita.  Garibaldi himself can be seen leading the unit on the right, his second in command, Bixio is with the units on the left.

The Picciotti, poorly trained and armed, sit in the hills waiting to see what will happen, the scenario prevents them from taking any part in the action until after the fourth turn, their combat effectiveness is also reduces by 25%

The Neapolitan infantry wait apprehensively, overlooking the well cultivated valley, they can hear the Red Shirts approaching but their line of sight is blocked by the woods on the hills opposite.

Both sides move into contact in the centre

The action in the centre flows back and forth attack being met with counterattack and both sides giving good account of themselves.

A few well placed rounds from the Neapolitan artillery on the right flank has pinned down the Picciotti in their hills and things are looking desperate for the Red Shirts

The Neapolitan reserve finally get under way but it's too little, too late and the game will be over before they arrive.

Through shear force of personality Garibaldi leads his men in one final charge and breaks the Neapolitan line, as the enemy fall back in disorder the game is suddenly over.

The game played out in very much the same way as the actual battle 169 years ago, I guess that's the mark of a well designed scenario.  The figures are nearly all conversions from various American Civil War figures and the practised eye should be easily able to distinguish their origin, I counted seven different manufacturers making up the Red Shirts.  The game involved a lot of different terrain features, which took a while to set up and get acquainted with, but after that it moved very fast and we were done in about two hours. 

Friday 21 December 2018

Lost and Found

I recently recovered the hard drive from a laptop long since out of use, among numerous pictures of cats and holidays there were a few of toy soldiers, including these:

Clearly the early moves of a wargame but I don't remember when, who was playing or what the rules were.  No matter, it's always nice to see old toys out on the table.  I think I originally posted these pics up on one of the old Yahoo Groups so there may be more of the same wafting around in the ether.

A close up of the Allied Command.  Most of the mounted figures came from the collection of John Ruddle and have seen action in his legendary garden wargames, a few of the foot conversions are my own humble efforts.

Wishing a peaceful, happy Christmas to one and all, hopefully there will be more toy soldiers in the New Year.

Friday 20 July 2018

Battle Cry in 54mm

For those unfamiliar with it, Battle Cry is a boardgame set in the American Civil War, it's played on a hexed board using 20mm toy soldiers which are activated by drawing order cards.  Separate terrain hexes can be laid on the board to create an infinite variety of battlefields.   In need of some diversion from One Hour Wargames, and as Anthony had acquired a mat with 6" hexes, we opted to run a game of Battle Cry using 54mm toy soldiers (also I realised my ACW toy soldiers hadn't had an airing since the Gettysburg game in 2013).

The game also includes a number of scenarios based on actual battles showing you where to lay out the terrain features and the starting positions for all units.  We decided to refight the First Battle of Kernstown   This sees the Confederates under Stonewall Jackson inadvertently attack a much stronger Union force due to faulty intelligence.  Here's how the game went:

View of the left and centre of the field from the Rebel side.  The Union artillery dominates the Rebel left from the commanding hills in the background.

The Rebel right and centre, the picket fence running through the middle of the field provides scant cover but creates a clear psychological barrier and rallying point between the two forces.

All movement and weapon ranges are measured in hexes rather than feet and inches, combat is between units rather than individual figures and is decided by simple dice rules. This makes for a fairly fast moving game once you've gotten used to the terrain effects, which are central to the system.

The Rebels hold a naturally strong defensive position, the treeline on their left protects that flank from the Union artillery and helps to even out the disparity in numbers between the two sides.

The Union force commands all the high ground and comprises 9 units of infantry, 2 cavalry, 2 guns and 2 Generals, while the confederates have 6 units of infantry, 1 cavalry, 2 guns and 3 Generals.

Aggressive Confederate cavalry action on the left keeps the Union right wing in check.

6" hexes are the ideal size for 54mm figures and give the game something of an old school Morschauser look.  If you don't want to stretch to buying a custom made mat it's easy enough to make one by cutting out a cardboard hex template and using it to draw around on a plain green sheet (if I can do it any idiot can!).

Most of the action was in the center and it could have gone either way as the relentless Union pressure took it's toll on the Confederates, finally a last desperate counterattack with a Rebel yell sent the Yankees running from the field.

On the Union right a massed attack broke against the stoutly held fence line and suddenly the battle was over. It could have gone either way and the Union force was slightly ahead for most of the game but that changed after the attack in the centre broke.In 1862 the battle was a tactical defeat for Jackson and the Confederates but happily in 2018 they just about managed to hold their own!  The whole game took abut two and a half hours to play.

This system is ideal for use with 54mm figures and we feel this size of toy soldier adds much to the visual aspect of the game.  It can be used without alteration for any of the modern wars in the second half of the 19th century and I have a fancy to try it for a Crimean game sometime (a chance to get out those Britains hollowcast guardsmen in bearskins).  Another bonus with this system is the the order cards provided are ideal for randomising movement if you are playing a solo game (as we all have to sometimes).