Showing posts with label DSG toy soldiers. Show all posts

Friday 14 January 2022

Battle of Metauro revisited

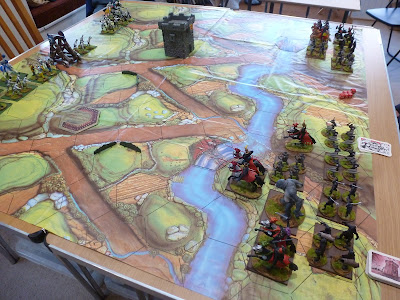
 In the closing weeks of last year Anthony and I decided to take his 54mm Battle of Metauro game for another spin, originally this was a board game made in Spain by Rojas y Malaret, Anthony took the original board and had it blown up as a gaming mat for 54mm toy soldiers, here's how the game works: (click on the images to enlarge them)


With the German (Hausser) version of the game you could purchase additional extension packs to increase both the number of figures on the board and also the variety of troop types, such as archers, light infantry and Gallic allies.  Accordingly, Anthony has been building up his collection of DSG Roman and Carthaginian forces in line with the expansion packs available for the original game.


The game opens with troops being placed on the squares with coloured triangles (each individual figure represents a unit), each square can contain 3 infantry, 1 infantry and 1 cavalry, 2 cavalry or 1 elephant.  You can have less figures on a square but you can't exceed these numbers per square, this can have an important impact on movement and combat later in the game.


Movement distances are 1 square for infantry, 2 for elephants and 3 for cavalry.  Woods and ruins provide cover and can only be entered by infantry.  Squares with rocks are an obstacle, they can't be entered or passed over by any troop types. Infantry in cover get a bonus in combat.


A unit moving into a square adjacent to a enemy must attack, combat takes place between individual units and the attacking player decides the order of combat, both sides roll a D6 to decide the outcome.  Highest score wins, 1, 2 or 3 have no effect, 4 or 5 cause the loser to retreat 1 square (2 squares for elephants), 6 is a kill and the losing unit is removed from he board.  If both sides get the same score (including bonus modifiers, see below) there is no effect.  A unit can only take part in combat once in each move turn.

There is no bonus for the attacker but infantry in cover get a +1 added to their score.  Cavalry always get a +1 in combat while elephants get a +2.  Only the Carthaginians have elephants (obviously) but to even things up the Romans get 3 designated figures who can attack and force the elephants to retire. 
 

Rivers can only be crossed at the fords indicated by stones, the central rocky plateau (shown here in orange) counts as cover for infantry, the rocks on three sides around it are impassable.

After combat, a losing unit forced to retire must move into the square directly behind it (elephants retire 2 squares), subject to that square being accessible to the retreating unit type and having enough space to accommodate them i.e. a cavalry unit can't retire into woods or into a square containing 3 infantry, 2 cavalry or 1 elephant, but can retire if the square is empty, has 1 infantry or 1 cavalry on it already.  If the losing unit cannot retire onto the square behind, it is destroyed.  This can be particularly problematic with elephants, you need to keep plenty of retiring space clear behind them!


After each individual unit combat, if one unit is destroyed or forced to retire, the the victorious unit can choose to occupy the vanquished enemies place on his square.  

E.g. 3 Roman infantry move up to an enemy square containing 1 infantry and 1 cavalry. The Roman commander chooses one of his infantry to attack the Carthaginian infantryman, the dice scores are 4 against 3 so the enemy infantryman is forced to retire and the victorious Roman moves into his square, beside the Carthaginian cavalryman.  Next he chooses the second infantryman to attack the Carthaginian cavalryman, the dice scores are 4 against 5 but the cavalryman has a +1 making 6 so the attacking infantry unit is destroyed and removed, but the victorious Carthaginian decides to stay where he is and not occupy the Roman infantryman's square.  Finally the Roman commander uses his third infantryman to again attack the Carthaginian cavalryman, who can't fight back because he has already been in combat this turn, the Roman throws D4 forcing the cavalryman to retire and moves into his square.  

At the end of this move turn this leaves the 2 Roman infantry in the square adjacent to the Carthaginian infantry and cavalrymen who have been forced to retire.  It is now the Carthaginian move turn and they must attack the 2 Roman infantry units in the adjacent square, both side are effectively pinned.  If the victorious Roman units had not advanced into the vacated square during the last round of combat described above there would have been a gap between both sides and the Carthaginian units would have been free to redeploy.


The game is won by killing your opponent's General or occupying both of the camp squares on their baseline.  

Simple, quick play rules, easy to learn but with subtleties that can cause a few unpleasant surprises, the game system is very well suited for use with 54mm toy soldiers and increasing the number of units in play adds greatly to both the visual impact and tactical opportunities.

In our previous game we tended to try and occupy the areas of cover which dominate the centre of the board in order to acquire the +1 combat bonus for infantry and it became a bit of a slugfest there with the mounted units dancing around on the periphery.  In the game pictured above the Carthaginians allowed the Roman infantry to occupy the ruins in strength and left cavalry units hovering around to block any attempted breakout, effectively turning the ruins into a POW camp.

Tuesday 17 August 2021

Batalla del Metauro

 From the same stable as the Battle of the Little Big Horn game that Anthony and I played back in June comes this Punic Wars game based on the Battle of Metaurus.  Originally designed and published in Spain by Rojas y Malaret, as part of a series of games called "Great Battles of the World" then subsequently produced under licence in Germany by O.M.Hausser.

This is the box art for the German version of the game, which Anthony acquired and then had the board copied onto a 6'x4' mat so that we could play it using 54mm toy soldiers.

It's a different layout to the Little Big Horn game but you can see that the graphics are the same style.  This is the Carthaginian end of the board, forces start with the river behind them and on the base line behind the river, either side of the tree, are two standards, the object of the game is to kill the enemy General or capture both standards.  Possession of the elephant should have been a game winner, sadly I proved to be no Hannibal!

At the Roman end of the board the troops start off in wooded country and have two cavalry units, pitching mobility against the greater combat strength of the Carthaginian elephant unit.  In the centre of the board there is an impenetrable mountain range with surrounding woods and an area of ruins.

Terrain features such as woods, ruins and the mountainous areas in orange are accessible only to infantry, but the lines of rocks are unpassable to all.  These features provide cover and give a combat bonus to the infantry occupying them.  The river can only be crossed at the three fords.

The figures we used were 54mm Romans and Carthaginians made by DSG of Argentina.  The dark line running across the board is just where the original board was folded, it has no bearing on the game.  

The ruins in the centre of the board became the focal point of the battle and changed hands several times.  The trees, rocks and ruins don't come with the game, we just added them to improve the visual aspect.

The Roman cavalry were put to good use running rings around the slower moving Carthaginians.  We played the game using the original rules and numbers of  figures, combat and movement are similar to the LBH game so very easy to pick up quickly.  With the original game you could also buy add on units to represent different troop types and there was also an additional rule for combat with elephants.  The game took about an hour to play and going forward we agreed that it would give a more challenging and better looking game to increase the number of figures used.

This is the contents of the Hausser box, the infantry and cavalry are 40mm Elastolin figures, they incorporated the original elephant made by Rojas y Malaret from the Spanish version.  This box has had an add on set included as the Metauro game only came with one elephant, there was another game based on the Battle of Zama, which had two elephants.  The Zama game also has a different board layout, it is played across an open area with stockade encampments at either end.

These are a couple of the figures from the original Rojas y Malaret game, the infantry (which I couldn't find when photographing this) are a bit over 54mm, the riders here are 54mm but you can see that the horse and elephant are not to scale.  The elephant is a solid one-piece plastic moulding.

Friday 28 February 2020

Still limping on the long road home from Moscow

For Napoleon's Grand Armee, the humiliating retreat from the Russian capital is about to turn in a nightmare of epic proportions. 

While the muffled boom from the Russian guns, harrying the rearguard, drifts across the endless plain, the Cossacks look for any opportunity to pick off stragglers or fall on unescorted wagons.

The Cossacks attack in waves but are easily held off by formed up bodies of infantry, or scattered when they come under artillery fire.  An unfortunate salvo from the rearguard falls near the wagons and sees a unit of Cossacks driven off by friendly fire!

The Bavarians trudge on, shadowed by the menacing Cossacks, they know their only hope of salvation is to stick together.  Ahead of them in the right foreground the Russian main army is approaching from the flank and has set up a Grand Battery to ward off any attempt by the French to rescue their supply train and come to the aid of the rearguard.

Unprotected wagons are easy prey for the Cossacks, who suddenly appear like ghosts out of the swirling snow fluries.

………and never miss an opportunity for plunder.

The Russian main army makes it's appearance on the field...….

While the Grand Battery prepares to face the French relief force, which has now been spotted racing to save the supply column.

The column escort has now splintered into isolated pockets of resistance which are systematically picked off one by one

A unit of Saxon infantry, allied to the French, take shelter in the ruins of an abandoned monastery.

The Cossacks continue to plunder the column.

Nearing the end of the game, the French rearguard, seriously depleted, stood it's ground heroically just as it did in 1812.  While the Emperor and his staff, in a moment of distraction, fell prisoner to a passing Cossack patrol, okay that didn't happen in 1812 (but it could have!).

And suddenly it was all over!  Time to pack away all the toys and sit down for tea.

The rules used for the game were a Napoleonic variant of Funny Little Wars which are as yet unpublished and are here being playtested.  One new development is the use of polystyrene foam balls impaled on a matchstick (shown here in the centre foreground) so they can be fired from a cannon, this makes their flight rather erratic but it also makes it much easier to see what has been hit.  The figures were drawn from too many sources to list, and included many conversions, but most sharp eyed readers will be able to guess their origin (and if you're really stumped you can always ask!)

Saturday 22 February 2020

Limping back from Moscow

Somewhere in the deep expanse of Russia the Grande Armee of Napoleon I has begun the long march back to it's homeland.  A successful invasion had seen the most glittering army ever assembled in history, chase an elusive foe all the way to the gates of Moscow.  But then the snow began to fall........
A French column is strung out on the march struggling through the drifts and eddies of snow, danger on every side form wolves, partisans and the dreaded Cossacks.  The slow lumbering wagons must be protected at all costs, they contain the food and ammunition essential to the survival of the army, not to mention all the loot plundered from the city.

Much of the Armee is composed of foreign contingents pressed into the service of the Emperor, here the Bavarians show good order as they trudge through the endless bleak landscape.

A French rearguard screens the column from the pursuing Russians, led by the redoubtable Marshal Ney, who is seen here on the left, conferring with Marshal LaSalle (quite amazing really, seeing as the later had been dead for three years by 1812, but history is a minor inconvenience when it comes to playing with 54mm toy soldiers!)

The well supplied, hardy Russian infantry catch up with the column and start to exert pressure on the rearguard.

The Russians throw themselves at the French oblivious to casualties, buoyed up with vodka and inflamed with patriotic zeal.

The French rearguard fall back steadily, contesting every inch of ground, selflessly sacrificing themselves to buy time for the rest of the army.

The column marches on but now stragglers are falling by the wayside with every turn.

The Corsican ogre watches in dismay as his grand ambitions begin to unravel and his army starts to  rapidly disintegrate.

Lurking in the shadows and on the flanks are the ever present and watchful Cossacks!

It was originally going to be a quick game put together at short notice between a couple of players, but such is the enthusiasm of the Funny Little Wars aficionados that it quickly escalated to seven players pitching in a few hundred figures on a thirty foot snowscape.

Well what else are you going to do on a wet, windy Monday afternoon in London?

Friday 21 June 2019

Battle Cry and the Risorgimento

The date for our next game had been in the diary for a couple of months and we talked about trying something different, but as the day drew nearer one of my cats broke a leg, which rather changed the dynamic in our calm and peaceful household.  Rather than postpone we opted for something easy to set up and play, but still wanted something a bit different.  A quick search through the scenarios on the Command and Colours website gave us Garibaldi's invasion of  Sicily in 1860 and the Battle of Calatafimi.

Garibaldi has landed and declared himself dictator of Sicily, as he marches on the capital, Palermo, the Neapolitan General Staff send General Landi to block him and put down the popular insurrection.  As usual we were playing a wargame with 54mm toy soldiers, here's how it went:

The opening positions find Garibaldi and Bixio with their 1,000 Red Shirts (the "Mille") occupying the village of Vita on the left, Major Sforza has rushed the Neapolitan infantry forward to occupy the hills of Pianto dei Romani in the centre.  On the hills beyond we can just make out the Picciotti, local militia, who have turned out to support the uprising.  On the right we find General Landi in Calatafimi bringing up the rest of the Neapolitan troops.

The Neapolitan troops have been pushed forward to occupy the hills, the artillery is served by seasoned professionals, the infantry are well trained and armed but are raw recruits, if they lose a morale check they will fall back two hexes.

General Landi in Calatafimi rouses the Chasseurs and reserve infantry, but they won't move out until after the fourth turn.

Garibaldi's Mille advance on the hills from the village of Vita.  Garibaldi himself can be seen leading the unit on the right, his second in command, Bixio is with the units on the left.

The Picciotti, poorly trained and armed, sit in the hills waiting to see what will happen, the scenario prevents them from taking any part in the action until after the fourth turn, their combat effectiveness is also reduces by 25%

The Neapolitan infantry wait apprehensively, overlooking the well cultivated valley, they can hear the Red Shirts approaching but their line of sight is blocked by the woods on the hills opposite.

Both sides move into contact in the centre

The action in the centre flows back and forth attack being met with counterattack and both sides giving good account of themselves.

A few well placed rounds from the Neapolitan artillery on the right flank has pinned down the Picciotti in their hills and things are looking desperate for the Red Shirts

The Neapolitan reserve finally get under way but it's too little, too late and the game will be over before they arrive.

Through shear force of personality Garibaldi leads his men in one final charge and breaks the Neapolitan line, as the enemy fall back in disorder the game is suddenly over.

The game played out in very much the same way as the actual battle 169 years ago, I guess that's the mark of a well designed scenario.  The figures are nearly all conversions from various American Civil War figures and the practised eye should be easily able to distinguish their origin, I counted seven different manufacturers making up the Red Shirts.  The game involved a lot of different terrain features, which took a while to set up and get acquainted with, but after that it moved very fast and we were done in about two hours.