Showing posts with label Wargames - One Hour Wargames. Show all posts

Saturday 5 February 2022

What have the Romans ever done for us? Part II

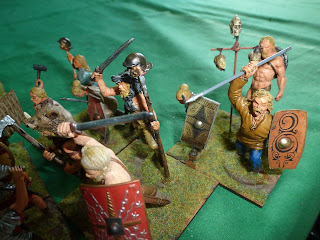
 We left our Roman Cohort battling against overwhelming odds, surrounded on three sides by the Germanic tribesmen.


Outnumbered three to one, with more tribesmen ready to join the fray the Romans can see two more cohorts of their comrades racing over the northern hill to rescue them. 


Too late, the Romans are cut down to a man.  

Victory conditions for the Tribesmen is to get 3 units off the table via the road to the south, so technically the game is over at this point but we couldn't just leave it there, it's not about winning, it's all about playing the game.


Just when it looked like it was all over, a unit of Roman auxiliary cavalry thunder around the woods to the north west in hot pursuit of the fleeing Tribesmen.


At the same time the alarm is raised as a body of Roman skirmishers and seen working their way through the woods.


The Roman cavalry witness the massacre of their infantry and spur headlong into a charge.


The Tribesmen reform to meet the threat from behind while their archers find easy targets among the advancing enemy cohorts and cavalry.


Back in the woods, the Germanic skirmishers have sprung an ambush on their Roman counterparts, both sides are expert at fighting in loose formation and making full use of cover, they slug it out but with little progress and few casualties on either side.


The Tribesmen have turned to face their pursuers and throw themselves into the attack, more Roman infantry are approaching from every direction but their attacks are made piecemeal and the Germans break them up systematically.


In the end the Tribesmen have taken a lot of punishment but have seen off the Romans and now continue on their way, to lick their wounds and fight another day.

The game ran to about 12 turns and reached a surprising but satisfactory conclusion, in summing up we felt that the slower ponderous movement of the cohorts was the deciding factor, if they could have caught the tribesmen as a cohesive force rather than entering piecemeal then their armoured front wuld have won the day.  As it was we both learned a great deal about the importance of pinning the enemy and then delivering flank attacks, something which is difficult to achieve in later periods with OHW where firepower is more dominant.

And it was great to play with such nice toys!

Wednesday 2 February 2022

What have the Romans ever done for us? Part I

 Well they gave us roads!  And here's a nice straight one, just the job for scenario 13 of One Hour Wargames (OHW) by Neil Thomas.  After several grid based games in recent months we decided it was time to get back to a more traditional style of play.  That's not entirely true, Anthony has recently built up a very nice 54mm toy soldier collection of Romans and German Tribesmen, and we were both itching to see them on the table.  Here's how it went:


One Hour Wargames is an ideal game system to use with 54mm toy soldiers and requires minimal amounts of terrain, we chose scenario 13 which sees a German raiding party returning home chased by a Roman Legion looking for vengeance!  

The battlefield is split sown the middle by a fine straight Roman road running North to South, in the north corner is a small hill and on the other side of the road, a little further south is a sizeable forest.  The opening position sees 6 German units following the road from the north and discovering their route home blocked by a Roman cohort on the road to the south of them.


We used the OHW "Ancients" rules but incorporated the Warband features from the "Dark Ages" section, as it better reflects the nature of the German tribesmen and gives them greater mobility with a combat bonus to offset the armour advantage of the Romans.


The Germans drew 4 Warbands of warriors, 1 of Archers and 1 of Skirmishers.  The Romans drew 4 Cohorts of infantry, 1 of Auxiliary cavalry and 1 of Skirmishers.


The Roman Legionaries here are modified from A Call to Arms figures to make the poses more realistic, all the figures in the collection have been expertly converted by Rupert of  Drum and Flag toy soldiers.


As the German tribesmen charge headlong up the road two of the Warbands peel off to move around the flanks of the Roman cohort blocking the way.  The skirmishers have already moved into the woods behind them to protect the rear, with OHW skirmishers have little combat value but are good for holding rough terrain, from which they can dominate the surrounding area with fire while remaining relatively safe.


The Warband figures are converted from several sources including Weston Toy Co Mexicans, and Expeditionary Force Early Germans


Here the German skirmishers (converted from HaT figures) have taken up position in the woods to protect the Warbands from any pursuers.


Two more Cohorts from the Roman Legion have now appeared on the hill to the north east and charge in support of their beleaguered comrades. 


The Roman Cohort blocking the road has been retiring in order, maintaining a steady line while the Tribesmen bear down on them.


The leading Warband slams into the Roman shieldwall while two more hit the flanks.  Can the Cohort hold out long enough for their comrades to reach them in time?

Monday 26 October 2020

A Crimean One Hour Wargame.

 A few  weeks ago we decided to hold an impromptu socially distanced game before the Powers that Be extended the lockdown to prohibit meetings of more than one household again.  These are strange times. The 2 metre wide table and a few other simple measures ensured that proper social distancing was observed, it's not difficult when there's a will and common sense prevails.  

Scenario One, Pitched Battle, was selected from OHW and toys suitable to the Crimean War were quickly garnered together.  The scenario called for a minimal terrain, the British drew units of infantry, skirmishers and cavalry while the Russians were favoured with infantry, cavalry and artillery!  Here's how it went:

Without any artillery the Brits had little option other than to pitch straight into the attack before the Russian guns ground them down.  "Into the Valley etc. etc."

Threatened on the flank, the Cossacks charge home but are bounced off by the doughty Dragoons of the Heavy Brigade, an immediate counter attack sees the Cossacks dispersed and routed.

Russian regular Infantry and Rifles wheel about to enfilade the advancing British line, they deliver a devastating volley that shatters a Regiment on the English right.

The thin red line holds and delivers it's own volley, both sides are now taking punishment and the British skirmishers have been brushed aside.  Here the British deploy their long range measuring tape.

The Battle began to pivot as the British faltered on their left but made gains on the right, at this point honours were even and it was still anybody's game.

Having seen off the Cossacks the redoubtable Dragoons followed through and rode down a Regiment of Infantry, only to flounder beneath the Russian guns on the ridge.  The withering Russian fire now began to tell and the British attack ground to a halt.  

The game lasted 8 moves, probably the quickest we've played, usually we go the full 15 rounds, but at least we got a game in, it was good to see toy soldiers back on the table and who knows when the next game will be?

Sunday 2 February 2020

One Hour Wargames in the Dark Ages

With the Christmas break a distant memory it was time to get the new gaming season off to a start, and as Anthony had recently acquired a collection of Saxon and Viking toy soldiers made by Expeditionary Force of Singapore we had to give them an airing.  Here's how it went:

We chose to play Fighting Retreat, (scenario 20) from One Hour Wargames by Neil Thomas, which sees a small Viking warband falling back while delaying a larger force of pursuing Saxons, thus allowing the main body of raiders to escape to their longships laden with the plunder.

Above, the raiders have crossed the river and their skirmishers have occupied the woods ready to surprise the Saxons who are just approaching the ford in the river.

Here the mounted raiders are putting distance between themselves and their pursuers while the slower moving footmen, realising that they risk being ridden down, have turned and formed a shieldwall.

We have used this scenario before for a medieval game (OHW link on the right should find it), but this time it played out very differently.  The thing we like best about OHW is that it uses the same basic rule structure for every historical period, but there are subtle changes to how the rules work, within each particular period, to reflect the developments in weaponry and tactical practice as military science evolved.  

The Saxon host cross the river at the ford, cavalry in hot pursuit, followed by fleet footed skirmishers and finally the mass of infantry.

So the basic game is very quick and easy to master, but what intrigues us is testing out the effects of those subtle changes to see how well they reflect the chosen period.  In this case we found the unit movements were much more fluid and less formal than in the medieval period, also the skirmishers of these Dark Ages were much less effective than the bowmen of the later period.  But the most notable difference was the resilience of the infantry formed up in a shieldwall, which was very hard to crack.

The Viking shieldwall braces itself for the impact of the Saxon cavalry, but holds without difficulty. The supporting infantry, following close behind, are forced into a bottleneck created by the ford and don't have enough room to manoeuvre around the melee.  Looks like I didn't think this move through  very well!

The Viking shieldwall has finally broken, but the Saxons have lost their cavalry and time is running out to prevent the raiders escaping, the Saxons surge forward and easily brush aside a unit of skirmishers.

The Saxons form sheildwall and face the remaining Vikings, they realise that the main body of raiders are clean away with the plunder, and that they will be advancing uphill fighting at a disadvantage...........so they decide to pack up and go home for tea.

These plastic Expeditionary Force figures are described as 40mm but they are clearly bigger than that, we compared them against my 40mm Elastolin Vikings and they towered over them (should have taken a pic for comparison, sorry about that!).  They come factory painted in the neat flat style you see here, personally I would give them a wash of brown stain (which is what Elastolin used to do) to give them a bit more definition, but they're not my toys so that won't be happening.

Anthony has mounted them on circles of MDF which provides greater stability on the table and also give them more of an "Old school" look.  This is the full range here; cavalry, infantry and archers for both Vikings and Saxon, that's the full extent of the range, shame they didn't extend to Normans but as Expeditionary Force have now moved upscale to 54/60mm figures this may be all we'll ever see from them in this size.

These were the first range issued by Expeditionary Force and were aimed at wargamers, the sculpting is excellent and while the plastic weapons look rather fragile they are in fact very robust.  Just wish we could find some other ranges (plastic or metal) that would compliment them, A Call to Arms Normans are a little too large, while the old Kellogs/Rubinstein "Warriors of the World" figures are about the right size but they are limited to just one Viking and one Norman.  Ho Hum.

Saturday 9 November 2019

Battle of al-Musayfirah 1925

We felt it was time to give the "One Hour Wargame" (OHW) rules by Neil Thomas another airing, Anthony and I both like the fast moving simplicity of this game system and it works well with 54mm toy soldiers.

Looking back through old copies of Wargames Illustrated for inspiration I found a scenario for the Battle of al-Musayfirah in 1925 during the Great Syrian Revolt.   After WW1 The League of Nations had given France a mandate to govern Syria and the French promptly instituted a number of measures to control the local tribes.  This inevitably lead to a nationalist uprising  by the Druze, which spread to the other tribes.


We chose scenario 15 from OHW, Fortified Defence, as it best reflected the actual battle.  Basically, a French Foreign Legion column was ambushed and badly mauled so the survivors took refuge in an old Turkish fort at Suwayda.  A relief column was prepared and an advance party sent forward to set up a defensive position at the town of al-Musayfirah as a staging post for the main column following behind.   A traditional colonial campaign in the finest traditions of P C Wren and Beau Geste, here's how it went:

On the left is the old Turkish fort at Suwayda, the town behind it in the rear centre is  al-Musayfirah, to the right of the town is a rocky area, in the OHW scenario this should be woods but rocks are more suitable for the desert so we just gave them the same terrain effect for movement and combat as woods.

We diced to see what forces each side would get, the French got 3 Inf, 2 Arty and 1 Cav, while the Druze got 3 Inf, 1 Heavy and 2 Cav.  That seemed to represent the original forces quite well, I wasn't sure what to use for the Druze heavy unit, in reality they had some artillery but I couldn't find any references to machine guns or other heavy weapons so a little imagination was called for.

The French start with one unit in the old Turkish fort at Suwayda and one in al-Musayfirah.  The Druze opened the ball with a mass attack on the garrison in the old Turkish fort.  Victory would go to whichever side occupied both the town and fort at the end of 15 turns.

The rules give the two garrisons additional firepower, which reflects the actual battle as the French had machine guns which took a terrible tole on the attackers.   To even things up the Druze have a refit rule which allows them to create a second wave with all their original units at their starting positions, rather like the Zulu wave mechanism we used in our recent Rorke’s Drift game.

The French cavalry came from the collection of veteran wargamer John Ruddle who created them from bits and pieces of old Britains hollow cast Spahis, all repaired and repainted.  Behind them the French Command are represented by Starlux mounted FFL.

The first wave of the Druze attack succeeds in overrunning the defenders in the fort and pushing back the relief column.  At this point they invoked the refit rule, leaving the fort abandoned temporarily while the second wave formed up for a renewed attack.

In the Druze second wave one unit has reoccupied the fort while the main push is directed against the garrison at al-Musayfirah.  Here the remaining infantry and Command, with heavy unit attached, use the cover of the rocky terrain to advance for a mass attack on the town.  The camel borne gun is the handiwork of Ross Macfarlane, as are the fort and town buildings.

The all out assault goes in, Druze mounted units rush the town while the foot provide covering fire from the rocks, will the beleaguered garrison hold out?

As we reached turn 15 and the end of the game, the superior firepower of the French forces carried the day.  A bombardment of the fort drove the Druze defenders out, leaving it unoccupied, while the mounted units caught in the open were wiped out by the French mountain artillery.

Anthony insisted we take a picture of the lunch, l'd like to tell you it was something suitably North African but clearly it's traditional beer and pizza.

The game played out very similar to the real battle, in 1925 the Druze suffered heavy casualties from the French machine gun strongpoints in al-Musayfirah.  They did manage to break into the town and promptly made off with all the columns horses and donkeys, but the attack through the rocks was broken up by a continuous bombardment from French aircraft.