Showing posts with label Airfix. Show all posts

Wednesday, 21 May 2025

Lionheart - more playing with old toy knights.

 Our first trial game of Lionheart worked very well so we decided to expand on it by introducing some terrain elements and and an additional two unit types; Heavy Foot Knights and Mercenaries. The remainder of the armies were the same as in our previous game and we increased the number of actions in each turn from four to six per side.  The basic game mechanics were explained in my previous post HERE.

The French line up with Heavy Foot Knights on the left flank (just visible at the top of the pic) and the Kievan Mercenaries on the extreme right.  For the Mercenaries we used Medieval Russian Knights made in china by Supreme along with some made in Russia by Engineer Basevitch.

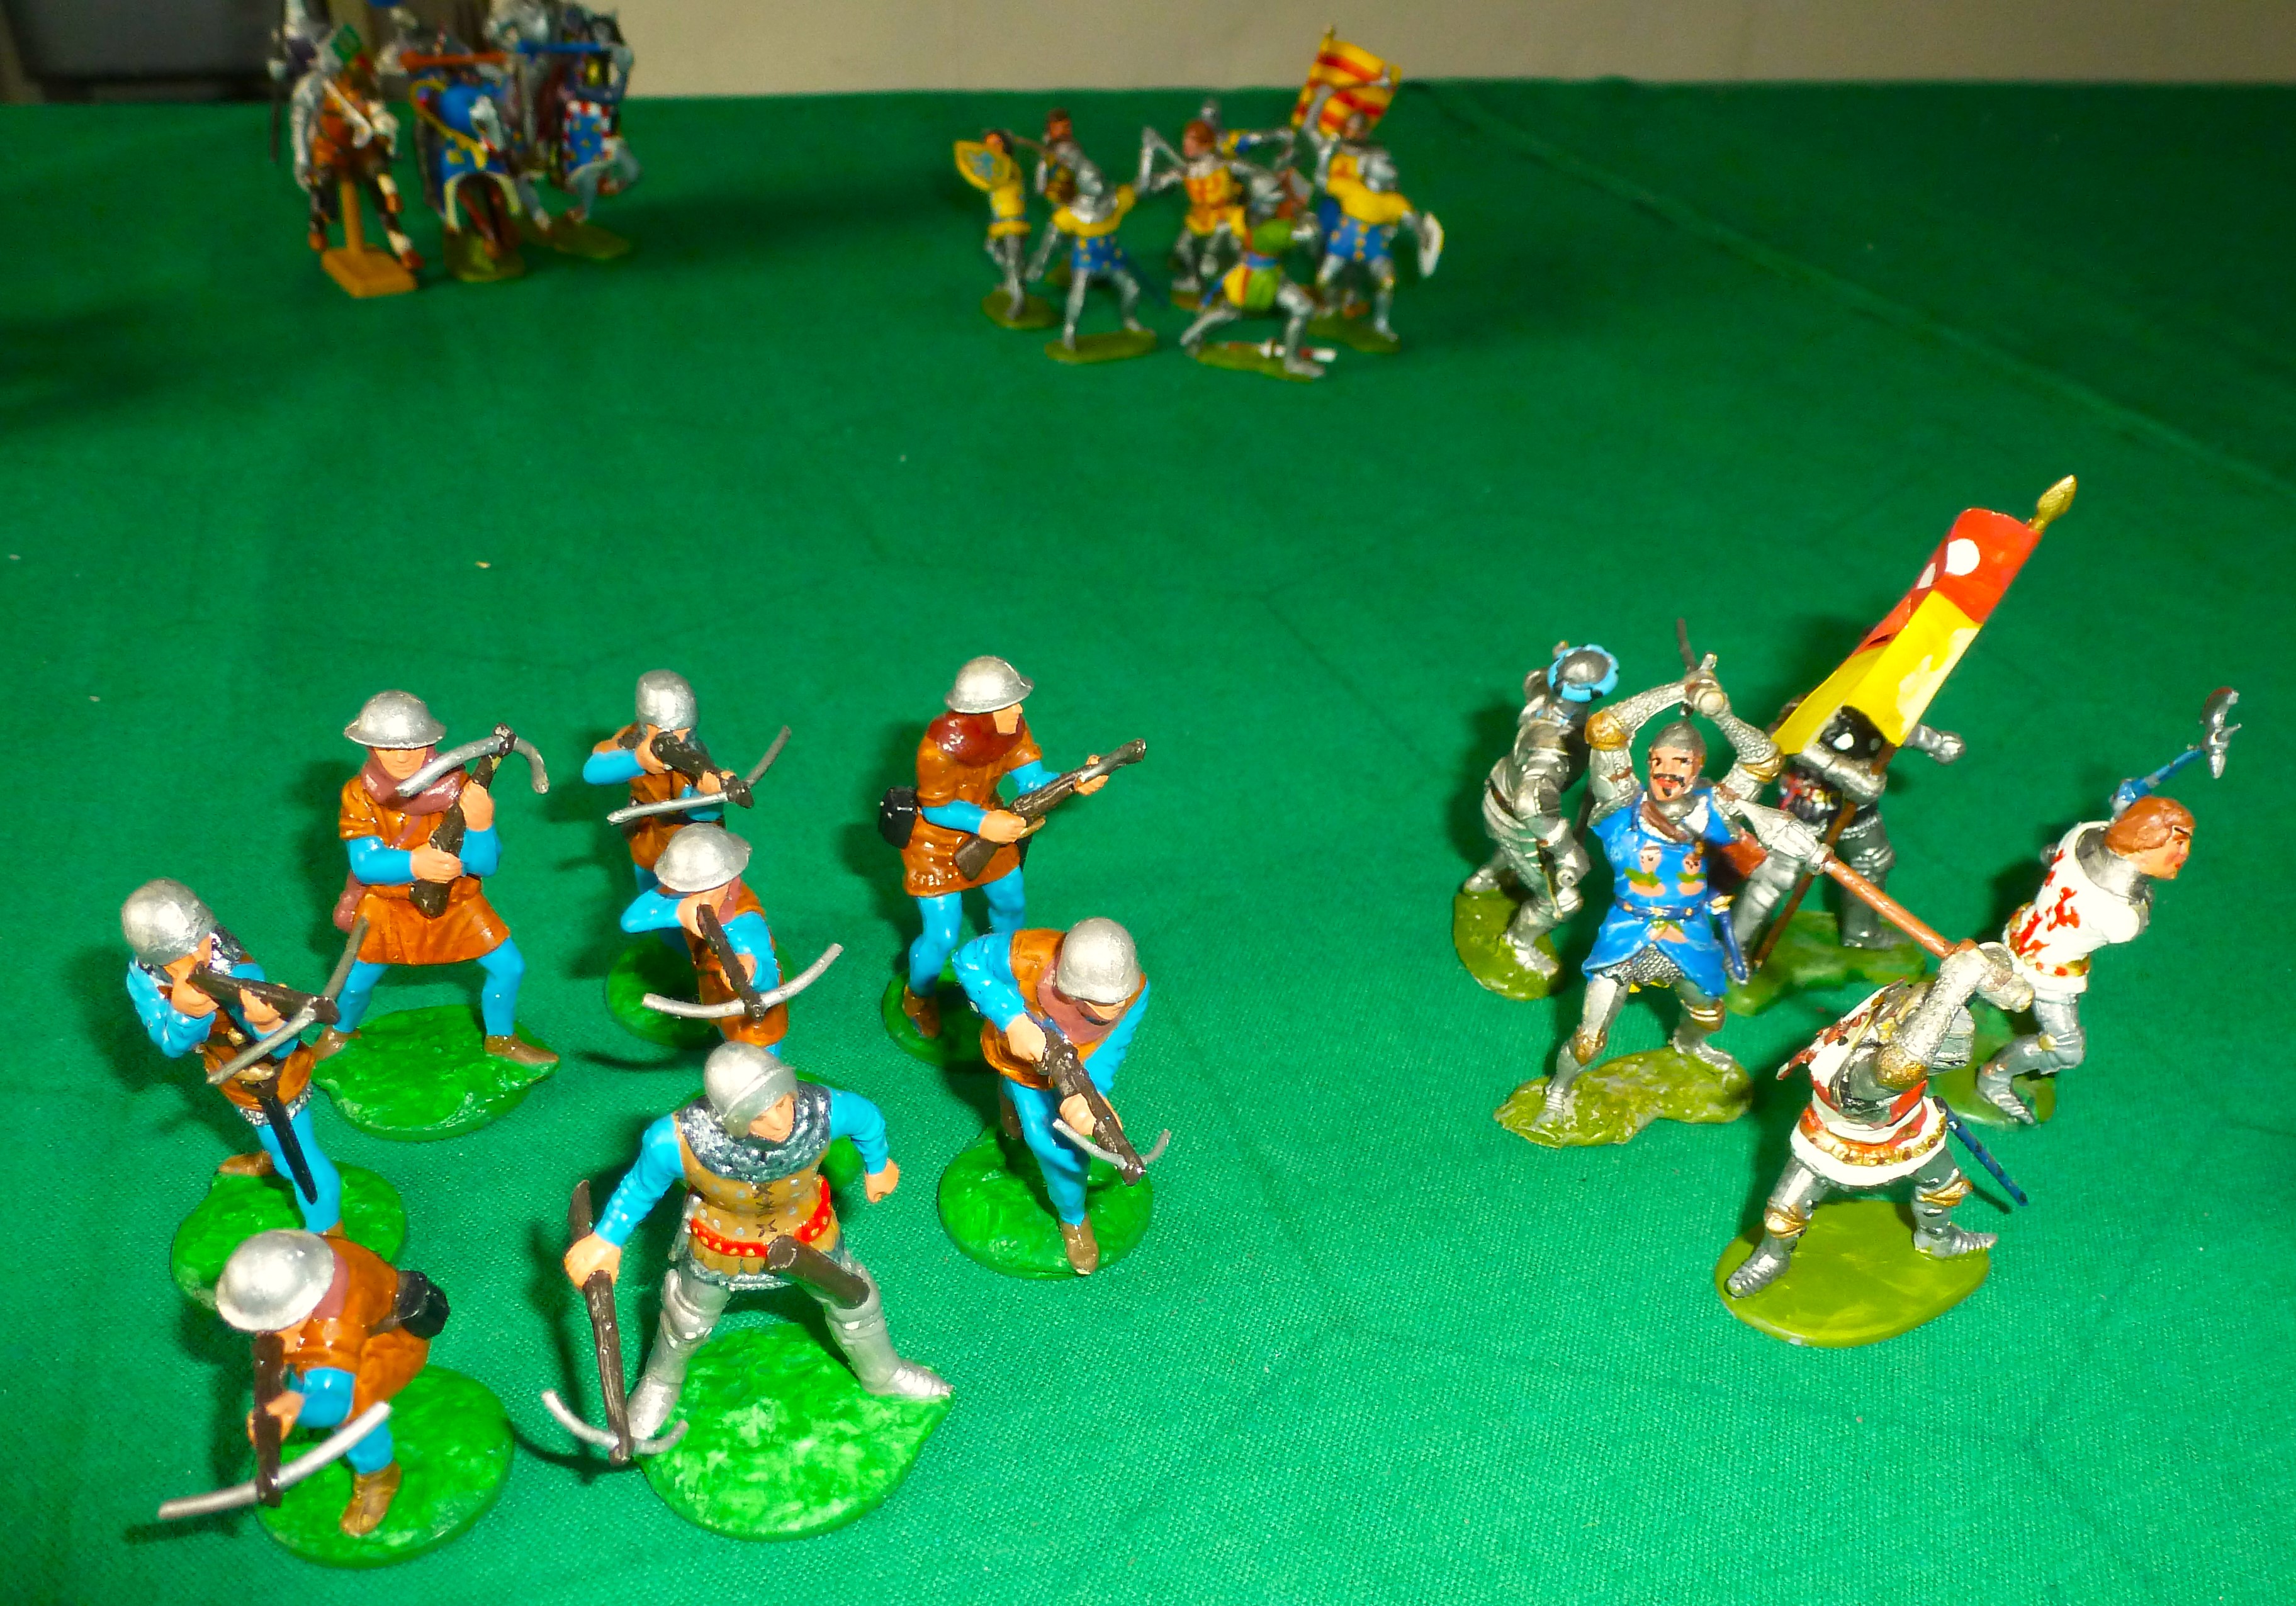
While the English line advances with Heavy Foot to the front (Britains Deetail knights just beyond the Timpo Crusaders) and Irish Mercenaries with their priest following in support.

The game allows for one more unit type; Peasants, but I didn't have any suitable figures to hand so we left them out, maybe they'll appear next time.

With their enhanced mobility it's always difficult to hold back the Mounted Knights, they charge across the field when they see an opportunity to strike.  This invariably draws out their opposite counterparts and leads to a duel between the chivalry.

  The Mercenaries are strong in combat and have the ability to induce panic in any unit they attack, forcing them to retire, the danger is that they can be turned if they come in contact with the enemy King and may change sides.

The terrain comprised a line of hills with a road running through them on one flank, a central plain and a forest with a road running through it on the opposite flank.  I like to keep things simple to begin with.

The Heavy Foot Knights (centre) are powerful in combat but very slow moving, it takes two actions to move them one hex, as a result they never really got into the game.

After the Mounted Knights had exhausted themselves duelling the Infantry and Archers moved in, the latter being quite vulnerable if attacked so need close support.

The Kings and their retinues tends to become a mounted reserve, kept safely out of the way behind the lines until desperation draws them out into the fray.

As things turned out all of the action took place in the central plain and virtually no use was made of the hills or forest.  (Note to self: put more obstacles in the centre of the field next time)

I always pick up bits and pieces of Timpo medievals when I see them in the cheap junk boxes at shows, they invariably have no weapons, scabbards or shields but that's easily sorted.  They are notoriously unstable on their small green bases so I mount them on 2p coins, this will be anathema to some people but lets face it they're not rare, you can find hundreds of them on the internet auction sites every day of the week.

This time the game was much less cohesive with small groups of opposing units engaging in clumps of combat dispersed around the field.

It's a good game system and I like the way it flows, I think we will need to give more thought to how we deploy the Heavy Foot Knights or revisit the way we allocate actions in each turn.  

With a little tweaking the system could be easily adapted to the Dark Ages or brought forward into the Renaissance, so we might have a go at one of those periods sometime.

Wednesday, 7 May 2025

Britains American War of Independance Swoppets.

 This past year I embarked upon a review of how I store and display the unruly mass of toy soldiers accumulated in a largely haphazard way over the past six plus decades.  


Everything is being separated out between collectables and figures for wargaming, the former to stand safely on a shelf gathering dust and looking pretty, the latter boxed securely in their units and ranks ready to be deployed on the tabletop at a moments notice.


I started picking up Britains and Timpo American War of Independence Swoppets with the intention of using them for wargaming, back then they were the only figures available for the period, but they were hard to find and by the time I'd acquire enough they were getting too brittle and delicate for the amount of handling involved.  I aught to let them all go but I don't feel quite ready for that yet.


The building in the background is the tinplate "Revolutionary War Tavern" made in America by Louis Marx, the mounted figure of George Washington to the front left of it is an old composition piece made by Elastolin.


In amongst the Britains and Timpo Swoppet AWI are a smattering of figures from other manufacturers such as: Shell Liberty Men of '76, Louis Marx Warriors of the World, A Call to Arms, Res Plastics for Kinder Eggs, Awesome Toys, Casualties of War, Airfix, and a couple of white metal models.


The building shown here is the Louis Marx tinplate "Civil War Mansion" from their "Battle of the Blue and Gray" playset.


Native American allies are provided by Mohicans from Britains Herald range and Charbens.

 These figures have all spent far too long languishing in boxes so it was nice to get them out and put on display where I can appreciate them a bit more.

Wednesday, 16 August 2023

Feast and Famine.

 We're already heading towards the end of the car boot season, and this year the pickings have been very thin, but last weekend there was a bumper crop:

The complete haul above cost less than £20 in total, particularly pleased to get the Tudor houses in the background which are ceramic ornaments and in scale for 28mm figures (but will work fine with 54mm).  The vast bulk of WW2 Airfix are conversion fodder destined to become medieval footmen.

I needed some French para's to go with my Viet Minh for the Indochina project but don't like to mess about with vintage Starlux if I can help it so these Hugennot copies will do the job just fine.

Some of the better odds and ends will be gifted or end up in the junk boxes at the Plastic Warrior Show next year.

At first I though the crude hollowcast copies of Britains Zulus were homecast and planned to repaint them but when I checked the markings under the base I saw they were made by Hanks, so I'll probably keep them as they are. 

Tuesday, 11 January 2022

Honved infantry for the Risorgimento

 Or at least my take on them. I've been sitting on a pile of Airfix Napoleonic French Line infantry and Grenadiers which I've been steadily trying to find other uses for, I got bored with painting French uniforms a long time ago!


In this case a unit of them are joining my Risorgimento project as Austrian Honved infantry from the  1840s.  Anyone conversant with the period will instantly recognise that the uniforms aren't quite right for such troops, but at least the colours are, more or less, and that's good enough for me.


A simple conversion, just a head change for a metal Austrian shako from Dorset Model Soldiers and a paint job, mounted on metal washers for stability and basing uniformity, the standard is printed from the Warflags website.


Some of the other units in the Risorgimento project have appeared here before in this game based on the Battle of Calatafimi


While I had the Dorset heads and the relevant paints out I added a couple of Austrian Artillery crews to the mix, these made from BMC American Civil War figures.

Saturday, 26 September 2020

Not Quite Victorious Army

 But I'm sure they will be when they eventually get onto the table for a game!

For some time now I've been building up a generic Chinese army, I'm not sure why and I can't remember how it started, perhaps I just like the colours.  And the flags, the flags are great.  Anyway, there is no grand plan, I just bang out another unit every now and then when an idea comes to me, it's quite therapeutic, doing something different.  Here's what I've got so far:


When I call them generic what I have in mind is that they will be used as an opposition in a Colonial scenario or possibly in the "Back of Beyond" or even at a stretch against Samurai.


These irregulars in black pyjamas and red bandanas are based on the Vietnamese Pavilion Noirs, mostly made from Hing Fat and other pirate figures, some have been given shields from wooden disks, others have Chinese heads (from Dorset Model Soldiers) just to give a bit of variety.


The flag has been cut out using pinking shears to give it a scalloped edge.  The inscription means something but I can't remember what, hopefully nothing rude.


Imperial Infantry, Artillery and Cavalry in the centre, irregular horse on the flank.


The matchlock men are more Hing Fat pirates, their tunics extended with plasticene, otherwise just a paint job.  The spearmen are medieval knights, made in China, which are currently available everywhere, and very useful they are too.  For a more Quing period look they've been given plumes on their helmets and replacement spears from metal rod with tassels added.


The cannon started life as a table cigarette lighter, it looked sufficiently gaudy for the job and just need a spruce of paint.  The crew have been given Mandarin hat heads (Dorset Models again).


The Imperial Cavalry started life and Italieri Mongols, the flags I found on the internet and just played around with them in Publisher.


The irregular Cavalry are the remains of the Italieri Mongols padded out with some Huns made in Spain by Jecsan.


More of the irregular Cavalry.

Tuesday, 19 November 2019

Stuart Asquith's Big Wars - Battle of Tanga 1914

Across the blogosphere collectors and wargamers are running games in memoriam to Stuart Asquith who sadly passed away recently, I hadn't cleared up after our recent game set in North Africa so decided to play a solo game using the Big Wars rules written by Stuart and Jack Alexander.  Big Wars covers the period 1880 to 1914 so I thought the Battle of Tanga fought during the WW1 campaign in German East Africa would squeeze under the wire.  I had to take a few liberties historically but here's how it went:

In November 1914 Britain sent an Indian Expeditionary Force of about 8,000 men to invade German East Africa, the plan was to make an amphibious landing at the port of Tanga then advance north to meet up with troops marching south from British East Africa, trapping the German "Schutztruppe" in a giant pincer movement.  A simple plan, what could go wrong?  Er….. plenty apparently.

There was an unofficial Coastal Truce agreement under which the Royal Navy were required to give the Germans 24 hours notice of any intended attack (I kid you not!).  On 2nd November 1914 the Navy demanded unconditional surrender of the town and port, this was ignored and next day the IEF began landing, no resistance was expected from the token garrison.  However, on receipt of the demand the German commander had called for reinforcements and started digging in (well you would wouldn't you)

Tanga was the coastal terminus of the Northern Railway and the Germans began rushing troops by train, around the clock, to the port.  The initial IEF landing on 3rd November was supported by salvos from the supporting naval escort, it had little effect.  Above, the German Askaris were armed with the obsolete model 1871 rifle which fired black powder rounds, clouding them in smoke with every volley.  

Here the IEF debark from their landing barges.  I played the game on an area of about 5' x 5' which I found from previous experience is fine for Big Wars, movement distances are quite short and casualties from firing fairly light until you get to quite close range, so you really need to get troops into melee to get a decisive result.

A couple of liberties taken here for the benefit of a good game.  German naval units fought on land throughout the campaign, but not at Tanga, also the Germans had two field artillery pieces but they arrived too late to take any part in the battle.  On the British side most of the units were from Indian Regiments but I have included units of the Kings African Rifles who also fought throughout the campaign but not at Tanga.

The Askaris fall back steadily while keeping up a steady fire at close range which begins to blunt the advance.  The rules allow artillery and machine guns to move or fire, but movement rates for MGs not mounted on carriages are short so the British support units fell far behind the infantry advance.

The IEF occupy part of the town and the Ghurkas hoist the Union Jack but their success is short lived as German reinforcements continue to arrive and a counter attack throws the British back.

A fun game, quick and easy to master, and a good scenario for solo play as there isn't much scope for tactical movement.  I playtested the rules quite a bit when they first came out in 1993 and used them in a "play by email" game that I hosted a few years ago (see Big Wars link in right hand column) but apart from that they've been rather overlooked, perhaps it's time they got a bit more of a regular outing.

In 1914 the IEF outnumbered the Schutztruppe by 8 to 1 so, not unnaturally, the British Staff believed the battle would be a walkover.  The Navy were ordered not to support the attack so that the town might be taken intact for use by the occupying force, for the same reason the IEF mountain batteries were not landed.  The result was that the entire IEF was evacuated on 5th November leaving most of their equipment behind, perhaps not the most ignominious feat of British arms, but well up there.

Monday, 4 June 2018

OHW Smolensk in 54mm

At the weekend Anthony and I got together for our fourth game using the One Hour Wargame rules. Flushed with the success of our Napoleonic game we felt ready to take the next step and devise our own scenario, I chose to base it on the First Battle of Smolensk in July 1941.  We aren't sticklers for accuracy but do want the thing to feel right so the Germans had to be light, fast, hard hitting and cohesive while the Russians would be steady, solid, and hard hitting but uncoordinated. It's been a long time since I've played a  WW2 wargame with 54mm toy soldiers, here's how it turned out:

The German motorised units deploy to force a bridgehead across the river Dneiper. A reconnaissance unit dashes across the bridge, supported by elite assault troops, heavy and light tanks, antitank, mortar and two infantry units. A total of eight units, see note at end of post for further explanation about troop types.

The Russian defenders lie in wait; on the left, infantry in the woods backed by a unit of heavies, blocking the road to the bridge is an antitank gun, behind it KV1 and KV2 tanks are hull down on the hill, behind them the Guards division is held in reserve and the mortars await firing instructions. On the right two more units of infantry and two of navy have take up position in the woods and ruins of the city's suburbs. A total of 12 units.

A very strong position with defence in depth, the winner will be whoever holds the hill (where the tanks are stationed) after 15 turns.  In the actual battle the Russian forces put up a strong fight with fierce counterattacks but a weak command structure meant that they were poorly coordinated, to represent this we used the Shambolic Command rule (see here) so that the Russian Commander could only move or fire up to four units each turn.

The bridge is a vintage tinplate railway piece made in Germany by Gebr. Bing (Bing Brothers) around 1900, these usually sell for about £60 but this was in such poor condition I got it for £1 (about 20 years ago) I finally got around to stripping and repainting it for this game (there's nothing like a deadline to get things done). I painted it as a road bridge because the rail gauge is too large to go with the British made Triang railway tracks that I have.  The wooden western town buildings represent a peasant village or dacha (or something like that)

The badly mauled reconnaissance unit veers off the road to make way for the Pzw II and Stug following in support.

The Pzw II is a vintage piece made in Germany during the 1930's by GAMA, I thought it looked right at home in this setting.

The infantry have effected a river crossing by boats, just as they did at Smolensk in 1941, to represent this each unit must first advance to the river bank then next turn it can dice to activate the crossing by achieving 6+ from a throw of 2xD6, if it fails it remains where it is. Needless to say, only infantry on foot can cross like this, vehicles must use the bridge.

Units can move or fire in each turn but not both, apart from the mortars they all have a firing range of  2 feet.  The mortars have a range of 8 feet but needs a friendly unit to spot for them, the spotter needs to be within 2 feet of the target and have clear field of sight to them.

The two Russian naval units occupied the suburbs of the city, here represented by Airfix Strongpoint buildings which have been enhanced with fallen rubble and collapsed rafters.

Heroes of the Soviet Navy scramble through the ruins. The individual figures are mounted on metal bases which enables them to stand on uneven or sloping surfaces and prevents the tumbling domino effect. To make two distinct units I painted all the riflemen as white jackets, so they could also double as WW1 Russian/German sailors, the figures with automatic weapons became blue jackets so can only be used for WW2 and later.

Out of shot, at the far end across the river the Russian partisans have finally attacked the German mortar unit but are more of a distraction than a threat and are seen off without difficulty. The use of partisans is another special rule which we devised for our last Napoleonic game (see here) they can appear from any piece of cover or any table edge at any time subject to being activated by a throw of 6+ on 2xD6 - a very simple but effective game mechanism.

The German force has taken the bridge and cleared the surrounding woods but they are now too depleted to withstand the inevitable counterattack. 

The Russian heavies move in for the kill as they retake the hill and woods around the bridge.  In hindsight I think I gave the Russians too much cover, even with just four units firing each turn they were able to pick off the Germans quite leisurely. Also I made a tactical error in trying to punch through with the armour from the start, I should have infiltrated infantry across the river one unit at a time to spot for the mortars and soften up the defences before releasing the tanks. Ho hum!

The Russian mortars, these truly are the kings of the battlefield.

In 1941 the Germans forced the crossing and held the bridgehead against repeated counterattacks but the Russians retreated due to the threat of being cut off in a pocket by other German armies advancing to the north and south of them. I could have replicated the effect of this by requiring the Russian commander to make a graduated withdrawal but I didn't think of that at the time.  We play and we learn.

We both felt that the game worked visually but wasn't as satisfying as the previous Napoleonic game, it was just a bridge too far!

A note on the use of unit types.

This post assumes some knowledge of the One Hour Wargames rules that we use, these are very easy to assimilate and are designed to give fast play games for players who are short of time and space.  For each historical period both sides are allowed up to 6 combat units, which must fall into one of four different unit types, so for WW2 games the rules provide for infantry, mortars, antitank and tanks.  

This can be rather limiting if you hanker after a larger scale game and as we are not short of time or space we have expanded on the concept by increasing the number of units used and bringing in troop types from other historical periods, i.e. the machine age (WW1) rules provide for heavy units - slow moving but hard hitting and cavalry - very mobile but with reduced fire effect (which we used for the German reconnaissance unit). Other troop types were brought in from earlier periods; the Russian Guards and German Assault units used the zouave profile - elite units that move faster and hit harder, while the Russian Partizans use the skirmisher profile - light troops, very mobile but with reduced fire effect.