Showing posts with label BMC. Show all posts

Friday 15 April 2022

Upcycling a display cabinet

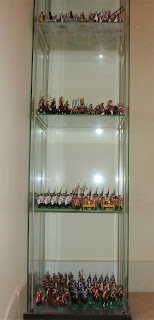
 Some years ago I picked up an IKEA display cabinet in a charity shop, and have been very pleased with it.  I got it for a reasonable price, and some time later learned that it is their DETOLF model, which is a "Best Seller" and is still available brand new for a very reasonable £65.  Here's what it looks like:

I use it to house my 7 Years War collection of wargames armies, which are quite attractive figures but the collection has now outgrown the four shelves in the unit.  It can house about 300 foot figures but as you can see the big drawback with this unit is that there's a lot of empty space and for years I've been looking for a suitable method to install additional shelves.  A few weeks ago a friend on facebook gave me the heads up on a firm in Northern Ireland who produce custom made supports and Perspex shelves for this very unit.  So I got some! 

The original shelf for two Regiments of Infantry (BMC AWI), two guns and two companies of Grenadiers (HaT and various conversions).  The new shelf supports are a bit fiddley to attach but after acouple of goes you start to get the hang of it and I managed to add a further eight shelves in the space available.

The new layout with additional shelf, for 2nd Cuirassiers, two more Regiments of Infantry and some light troops.  The figure of Old Fritz on the left is an early tin flat.

The original display of the Cuirassiers was a bit cramped.  The bronze disk in the foreground is dated 1757 and is a Campaign Medal issued for the battles of  Lissa (Leuthen) and Rossbach, I found it in a junk box of old coins 50 years ago when I was a teenager working a Saturday job in London's Portobello Road Market, it seemed appropriate to display it here.

The Austrian shelf (these also double as French but I need to do more flags) Three Regiments of Infantry (HaT Prussian infantry), two companies of Grenadiers (Italieri) a unit of Pandours (various conversions) and two guns (BMC)

On the left are the Russian contingent (BMC AWI) and on the right the Army of Brunswick (Marx infantry and HaT cavalry)

New layout with additional shelves.

And finally a closer look at the Russian Infantry and Artillery.

Tuesday 11 January 2022

Honved infantry for the Risorgimento

 Or at least my take on them. I've been sitting on a pile of Airfix Napoleonic French Line infantry and Grenadiers which I've been steadily trying to find other uses for, I got bored with painting French uniforms a long time ago!


In this case a unit of them are joining my Risorgimento project as Austrian Honved infantry from the  1840s.  Anyone conversant with the period will instantly recognise that the uniforms aren't quite right for such troops, but at least the colours are, more or less, and that's good enough for me.


A simple conversion, just a head change for a metal Austrian shako from Dorset Model Soldiers and a paint job, mounted on metal washers for stability and basing uniformity, the standard is printed from the Warflags website.


Some of the other units in the Risorgimento project have appeared here before in this game based on the Battle of Calatafimi


While I had the Dorset heads and the relevant paints out I added a couple of Austrian Artillery crews to the mix, these made from BMC American Civil War figures.

Monday 26 October 2020

A Crimean One Hour Wargame.

 A few  weeks ago we decided to hold an impromptu socially distanced game before the Powers that Be extended the lockdown to prohibit meetings of more than one household again.  These are strange times. The 2 metre wide table and a few other simple measures ensured that proper social distancing was observed, it's not difficult when there's a will and common sense prevails.  

Scenario One, Pitched Battle, was selected from OHW and toys suitable to the Crimean War were quickly garnered together.  The scenario called for a minimal terrain, the British drew units of infantry, skirmishers and cavalry while the Russians were favoured with infantry, cavalry and artillery!  Here's how it went:

Without any artillery the Brits had little option other than to pitch straight into the attack before the Russian guns ground them down.  "Into the Valley etc. etc."

Threatened on the flank, the Cossacks charge home but are bounced off by the doughty Dragoons of the Heavy Brigade, an immediate counter attack sees the Cossacks dispersed and routed.

Russian regular Infantry and Rifles wheel about to enfilade the advancing British line, they deliver a devastating volley that shatters a Regiment on the English right.

The thin red line holds and delivers it's own volley, both sides are now taking punishment and the British skirmishers have been brushed aside.  Here the British deploy their long range measuring tape.

The Battle began to pivot as the British faltered on their left but made gains on the right, at this point honours were even and it was still anybody's game.

Having seen off the Cossacks the redoubtable Dragoons followed through and rode down a Regiment of Infantry, only to flounder beneath the Russian guns on the ridge.  The withering Russian fire now began to tell and the British attack ground to a halt.  

The game lasted 8 moves, probably the quickest we've played, usually we go the full 15 rounds, but at least we got a game in, it was good to see toy soldiers back on the table and who knows when the next game will be?

Friday 21 June 2019

Battle Cry and the Risorgimento

The date for our next game had been in the diary for a couple of months and we talked about trying something different, but as the day drew nearer one of my cats broke a leg, which rather changed the dynamic in our calm and peaceful household.  Rather than postpone we opted for something easy to set up and play, but still wanted something a bit different.  A quick search through the scenarios on the Command and Colours website gave us Garibaldi's invasion of  Sicily in 1860 and the Battle of Calatafimi.

Garibaldi has landed and declared himself dictator of Sicily, as he marches on the capital, Palermo, the Neapolitan General Staff send General Landi to block him and put down the popular insurrection.  As usual we were playing a wargame with 54mm toy soldiers, here's how it went:

The opening positions find Garibaldi and Bixio with their 1,000 Red Shirts (the "Mille") occupying the village of Vita on the left, Major Sforza has rushed the Neapolitan infantry forward to occupy the hills of Pianto dei Romani in the centre.  On the hills beyond we can just make out the Picciotti, local militia, who have turned out to support the uprising.  On the right we find General Landi in Calatafimi bringing up the rest of the Neapolitan troops.

The Neapolitan troops have been pushed forward to occupy the hills, the artillery is served by seasoned professionals, the infantry are well trained and armed but are raw recruits, if they lose a morale check they will fall back two hexes.

General Landi in Calatafimi rouses the Chasseurs and reserve infantry, but they won't move out until after the fourth turn.

Garibaldi's Mille advance on the hills from the village of Vita.  Garibaldi himself can be seen leading the unit on the right, his second in command, Bixio is with the units on the left.

The Picciotti, poorly trained and armed, sit in the hills waiting to see what will happen, the scenario prevents them from taking any part in the action until after the fourth turn, their combat effectiveness is also reduces by 25%

The Neapolitan infantry wait apprehensively, overlooking the well cultivated valley, they can hear the Red Shirts approaching but their line of sight is blocked by the woods on the hills opposite.

Both sides move into contact in the centre

The action in the centre flows back and forth attack being met with counterattack and both sides giving good account of themselves.

A few well placed rounds from the Neapolitan artillery on the right flank has pinned down the Picciotti in their hills and things are looking desperate for the Red Shirts

The Neapolitan reserve finally get under way but it's too little, too late and the game will be over before they arrive.

Through shear force of personality Garibaldi leads his men in one final charge and breaks the Neapolitan line, as the enemy fall back in disorder the game is suddenly over.

The game played out in very much the same way as the actual battle 169 years ago, I guess that's the mark of a well designed scenario.  The figures are nearly all conversions from various American Civil War figures and the practised eye should be easily able to distinguish their origin, I counted seven different manufacturers making up the Red Shirts.  The game involved a lot of different terrain features, which took a while to set up and get acquainted with, but after that it moved very fast and we were done in about two hours. 

Sunday 25 November 2012

The mid C18th game begins to look like a campaign.

Earlier in the week I set the scene for the next play test of the 54mm C18th wargame rules, this time a Hanoverian army were offering battle so the storyline was altered a little: Having previously seen off the French Army Lilly White, the Frederickians have rushed to intercept "Pragmatic" Army Red, while they are strung out on the march, and prevent them linking up with the remains of the Lilly Whites.

The opening move sees the "Pragmatic" Army marching into the safety of a strongly defended town but a forced march by the Frederickians on a convergent road threatens to cut them off so they prepare a rearguard action to hold the bridge open.

The Frederickians deploy, cavalry on the left, infantry centre and right, guns on the heights by the old churchyard.

The town nestles in the bend of a wide fast flowing river, the banks are broad and marshy, the main road crosses a sturdy stone bridge and turns into the town square, a small track leads out of town over a rickety trestle bridge up to the church on the hill.

A hasty reconnaissance shows the town is well prepared with entrenched guns covering both bridges and a wide field of fire.

The garrison hastily stand to as the shout goes up "the Frederickians are upon us!".

"Pragmatic" Army dragoons take up position on the bridge while two regiments of infantry stiffened by a composite battalion of grenadiers form up to hold the road open.  Further out, two regiments of horse and another of dragoons hurry towards the bridge.

Five regiments of Frederickians march in oblique order across the face of the enemy to concentrate against the two regiments holding the road, while their cavalry wheel to the centre and charge home on the "Pragmatic" line.

Enfilade fire from the guns across the river drill through the Frederickian lines with devastating effect, further punishment is inflicted by volleys from the line, the bridge and the garrison.  The cavalry charge breaks against the "Pragmatic" line and is countercharged in flank by a regiment of their horse.

The Frederickian infantry reach their objective but an entire regiment lays shattered in the fields behind them.  On the right there are not enough troops to effect a breakthrough and the attack collapses, in the centre two regiments fall upon the remnants that have just withstood the cavalry charge and wipes them out, on the right the regiment of fusiliers turn aside to face the second regiment of  "Pragmatic" horse who are closing in from the flank.  A volley fails to see off the horsemen and after a short melee the fusiliers are overrun.

The final scene of carnage, both sides have fought themselves to a standstill but with only one regiment still intact and fresh enemy troops approaching, the Frederickians beat a fighting retreat.  Watching the defeat unfold the King exclaims "Teufel! I need more men" before quiting the field and sending off gallopers to call up the regiments from his Eastern Provinces, hire mercenaries and call in the pledges from his Allies.  "A battle is lost but the fight goes on!"

Ahh the joys of wargaming with larger scale toy soldiers rather than just leaving them to gather dust on the shelf!

Tuesday 20 March 2012

The Battle of Astrakhan (part 1) – A RussoTurkish wargame with toy soldiers.

Back in 1993 veteran wargamers Stuart Asquith and Jack Alexander published a set of rules, called “Big Wars” for use with 54mm toy soldiers after the style of H G Wells “Little Wars”.   Big Wars retained the simplicity of Little Wars but introduced mechanisms that would be recognisable to the modern wargamer of smaller scale figures.  Over on the FunnyLittleWars Yahoo Group messrs IJ and AG began a discussion about Big Wars and I offered to umpire a game between them to try out the rules for a bit of fun.

The umpires overview of the table

The initial dispositions, the Turks have concentrated to the south west of the field behind the cover of low hills and the ruins of a temple from an earlier civilisation.

The plan was that I would set up a terrain on my games table and allocate armies to each player.  H G Wells used to play his games on the floor and would rig up a curtain to go across the room so that each player could not see his opponents opening dispositions.  To emulate this I emailed Ian and Alan with photos of what could be seen at table top level from different points along their respective baselines.  The table measures 8’ x 6’ which we split into 6” squares annotated 1 to 16 along the length and A to L across the width so that the players could instruct me where to place their opening dispositions. 

To the north east the Russian forces prepare to occupy what appears to be a deserted village.

Infantry are formed in units of 10 plus officer and standard bearer, Cavalry comprise 5 troopers plus officer and an Artillery battery is 1 gun plus 4 gunners.  Each 6” square can accommodate two units of infantry or one of cavalry or one battery of artillery.  Infantry and artillery must start in a square on line A while cavalry can start from line A or B.  Units can also start off table but the player has to specify on which square they will enter the table.

The Turkish line begins it's advance

The background to the game is that the main campaign in the mountain passes of the Balkans has bogged down into siege and trench warfare around the city of Plevna.  To break the stalemate the Turks have sent a force over the Caucasus mountains in a raid to sweep across the Caucasian Plain, moving fast on a broad front living off the land and destroying everything in their path, emulating Sherman’s march to the sea during the American Civil War.

The Guard infantry, mountain guns and Naval contingent are deployed to the right flank.

Supported by mountain artillery, without any expectation of resupply or reinforcement their orders are to avoid pitched battle, march north in a feint towards Rostov then turn east avoiding Tsaritsyn (Volgograd) to attack Astrakhan from the landward while a naval flotilla makes a co-ordinated attack from the Caspian Sea.  Attached to the command are a group of Prussian advisers, veteran officers recently released from service after their victory in France, and a Naval contingent who will provide liaison with the flotilla for the attack on Astrakhan.

In the centre the Turkish light horse move to the crest of the hill.

The raid has two objectives, the first to draw enemy troops and resources away from the main theatre in the Balkans, the second to encourage a rising of the Kazakh and Uzbek cities of the Khiva Khanate, who have suffered the humiliation of Russian conquest in recent decades.  The capture of Astrakhan would provide a forward port through which they could be supplied with arms, the Cities are opportunists who will only back the winning side but it is hoped they will heed the call to jihad by their coreligionists but if that does not succeed the expedition will revert to bribery, it carries 30,000 pieces of gold provided by the British and American Governments who will are pleased to assist in any mischief which may cause the Russians some difficulty.

The light horse emerging from the ruins are conversions by Ross Macfarlane

Tomorrow, the Russians respond.

Monday 19 March 2012

The Battle of Astrakhan (Part 2) - a 54mm RussoTurkish sideshow between the Seas

Continuing the battle played by email with 54mm toy soldiers using the "Big Wars" rules devised by Stuart Asquith and Jack Alexander. 

News of the raid has caused consternation at Russian headquarters, reports are coming in that border posts in the mountains have been brushed aside and local garrisons overrun as the Turks advance in three swift columns, destroying everything in their path.  Orders have been sent out recalling all garrisons in the region to concentrate at Tsaritsyn to the north, no regular troops can be spared from the main front in the Balkans so the General Staff set to the job of improvising a command for the defence.
The Russian centre and left wing advance supported by field artillery.

A regiment of Cossacks and Riflemen from the Caucasus are being shipped across the Caspian Sea to Astrakhan where they will make a forced march to Tsaritsyn.  Hussars, Cuirassiers and Cossacks from the Imperial Guard are being ferried down the River Don, from Moscow. 

From his position in the centre the Russian commander surveys his right wing, covered by a screen of Cuirassiers his Lancers, Montenegrins and Caucasian Riflemen shelter behind the gentle slopes of Windmill Hill.

At Odessa a Brigade has been formed from dispossessed Montenegrin and Albanian refugees, they are being trained by Polish and Walachian Officers recruited from the French Foreign Regiment, recently disbanded.  Their lack of formal training is more than made up for by their fighting spirit, they are being shipped across the Black Sea to Rostov where they will be rushed east to join the general concentration.

The Russian right wing begins it's advance.

We join the action where the Russian forces have concentrated and moved to block the Turks advancing on Astrakhan, they are surrounded on all sides by the wastes of the Circassian Depression and there is no way round so the only option is to break through the Russian line.
On the left wing the Caucasian Cossacks and Albanians have occupied the village.

The two commanders have no idea what size or composition the forces opposing them will be or where they will appear on the battlefield, they can only discover this through probing with reconnaissance patrols.  In the north east sector a village built with stout mud walls nestles in the bend of a river making it potentially a very formidable defencive position and the Russian commander quickly moves to occupy it.
  
The Russians discover the village is empty and the plains opposite across the river are unoccupied.

The Turkish commander has deployed to the south west, avoiding the risk of excessive casualties from attacking a fortified position across a river, while the Russians discover that they have nearly a third of their force cut off from where the main action will take place.

Umpires note
I had originally intended the size and composition of the two forces to be very diferent but purely by chance rather than design they came out fairly even, they both had roughly 100 infantry, 20 cavalry, 2 guns and 6 Command.  The Russian field guns had an advantage in range over the Turkish mountain guns but in practice this was found to give no benefit. 
The players were not aware of each others victory conditions: for the Turks it was to break through the enemy line by taking at least 50% of their forces across his baseline, for the Russians it was to defeat the raid by preventing the breakthrough to Astrakhan and inflicting at least 50% casualties.  For both sides there was a bonus for whoever possessed the gold at the end.
Nearly all the figures used are conversions, the Turkish light horse, Guard infantry (in light blue zouave tunics), Montenegrins and Albanians as well as the buildings in the village were all made by Ross Macfarlane and featured in his Emir's Lair scenario (many thanks Ross).  The Russian Hussars and recast Britains Cossacks came from the collection of John Ruddle.  All the rest are my own humble efforts.

Tomorrow the combat begins in earnest.